Friday, 7 October 2011

How to make animations using photoshop

First open up Photoshop. That seems an obvious step, but you have to start somewhere. Once you open Photoshop you must set the color to RGB and the resolution of 72 dpi. This is web standard and it saves you a lot of headaches in the future. The size in pixels, and what size you want. If you are going to make an animated ad, it would be best for an IAB standard ad format to use.

animations using photoshop
This simple animation combines the two most common animation techniques in Photoshop: Turning layers off and on, and using the Tween command to animate the movement of an object on a layer.

Step 1: Set up your layers.

animations using photoshop
The first step in creating any animation in Photoshop is to build a layered Photoshop file with all the elements you plan to animate. Our example document has 7 layers containing the text for our countdown, and layers for the rocket and flame.

Step 2: Create Animation Frames with Layer Visibility.

animations using photoshop
Chose Windows > Animation to show Photoshop’s animation palette.

On the first frame, turn off visibility for all layers you do not want visible at the start of your animation. Then add one frame at a time, and turn on the layers you want visible for each step in the animation.

Changing layer visibility one frame at a time is a classic Photoshop animation technique that covers a wide variety of needs.

In our example, continue this pattern to reveal the countdown and the flame at the bottom of our rocket.

Step 3: Create Animation Frames using Tween.

animations using photoshop
Now that the countdown is complete, we need to create the illusion that our rocket ship is taking off. Add one more frame, and this time select the group called “Rocket” in layers and move your rocket off the top of your image window.

Then choose “Tween…” from the Animation palette’s pop-out menu.
animations using photoshop
Set how many frames to add, and Photoshop spreads the movement of your layer across those extra frames.

Step 4: Adjust your Timing.
animations using photoshop
Finally, go back through and adjust the delay for each frame of your animation. That time is shown in seconds below each frame.

Tip: You can hold down the Shift-key to select a range of frames (such as the 9 frames we added for the rocket’s takeoff) and change them together.
Step 5: Export the Animated GIF.

Finally, to export your animated GIF choose:

In Photoshop CS3: File > Save For Web & Devices…

In Earlier Photoshops: File > Save For Web…

animations using photoshop
Make sure the image type is set to GIF, feel free to experiment with some of the other options, and save your file.

Adobe Photoshop Elements Tutorial Free

Adobe Photoshop Elements Tutorial Free
Adobe photoshop elements tutorial free if you still have unanswered questions about software such as Adobe Elements, the various elements versions, what you can do with Adobe Elements, Photoshop Elements and how to apply, and where to find Adobe Elements video tutorials, this tutorial will answer Adobe Photoshop Elements them for you, as well as revealing some helpful tips Adobe Elements

Adobe Photoshop is the secret tool for professional photographers take great pictures is still a challenging program to learn. Given the learning curve that Photoshop requires a lot of everyday photographers feel intimidated by the program. Because of this, Adobe has introduced Photoshop Elements, a "lite" version of their popular programs. Adobe Elements has many of the same tools and features as Photoshop is much easier to learn and master.

What makes elements different from Photoshop?

Contains many elements of the same features and tools such as Photoshop. For example, both programs allow you to solve lighting problems, remove unwanted items, red-eye, and a variety of projects including scrapbooks, calendars and cards. These are just a few of the similarities between the programs. The main difference between the programs is that Adobe Elements is much easier to learn because it is easier to use interface. This advantage may be a newcomer to the program a quick assimilation so you can start working with your photos almost instantly. With Photoshop you can spend months learning all the tools and features.

I can find tutorials for Adobe Elements?

Whether you decide to use Photoshop or Elements you wish to view tutorials, to get on the right foot. You will find an array of tutorials available in various media, including online tutorials, DVDs or CD-ROM. Tutorials a great way to learn about the tools available (and how to find them) and show you several shortcuts to the various instruments. You can use several tutorials that focus on a number of features and you should expect to learn how to use text with your photos and the use of special effects, masks, layers, and a few other things.

What can I do with the latest version of Adobe Elements?

Whether you want an old photo or crop unwanted items in your images, the tools available in Adobe Elements 8 to recover will allow you to achieve your goals. It is a sad twist of fate that the pictures were taken years ago, will fade or get worn from handling. The built-in instruments, including the blurring and sharpening tools can help you recover your beloved memorable and keep them for future generations. Another common problem is to have red eyes staring back out at you. Regardless of your skill or the cost of your camera red-eye is a problem that even experienced professionals. Using the red-eye reduction tool can this problem be solved with a simple click of the mouse, not only of humans but of our four legged friends.

Adobe Elements Tips:

a) Combine multiple images using Photomerge feature and a seamless panorama. Further improve by using the rotate, zoom and pan tools.

b) Scroll through the different blend modes by pressing Shift + to the next mode and shift - to the previous one. These shortcuts can quickly view all modes rather than single click and view them.

c) Remember to use the picture package option to print all photos in various print size on a page.

Photoshop Video Library - Video Tutorials for Learning Photoshop

Photoshop Video Library - Video Tutorials for Learning Photoshop
We love to take pictures every now and then. Digital cameras have helped us to upload the pictures on our computers when we clicked. We can even remove some of the bad images from the camera.

Very often we take pictures that are good, but they miss something, sometimes the pictures are too bright, while at other times the light is less. These days you can even have the option of editing the pictures and making them perfect. You should be aware of the software programs available for those days that can help you easily edit.

But there are very few people who really know how to edit photos using the software. You might have heard of Photoshop.

You can download or buy this software to use to make your photos more attractive and you can start selling them through various websites and eventually make money. But you know how to use Photoshop. Using this software is not an easy task if you do not learn how to use it.

You do not have to worry because there are certain websites that you can offer good tutorial video to learn how to use Photoshop in a few easy steps. You can sign up for any of these websites and take a look at the video tutorial.

To learn Photoshop elements on your way this can be one of the best ways. The website promises to learn the Photoshop Elements within 2 hours. You just need the video and then on follow the simple elements and to the right place to click.

There are at least 30 sets of video tutorials offered by these websites. These tutorials will help you master Photoshop like never before. Once you learn how to use it you can start editing your photos and surprise your family and friends.

There are many people who are not sure whether these tutorials will work for them or not. You do not need to worry. If you are unsure then please visit the testimonials written by users. You'll see that most of these users are not aware of the Photoshop Elements before they had access to the videos.

But with the help of the tutorial videos can they work like a pro. It is very important to find the right kind of videos for yourself. There are few websites that can provide these kinds of videos, but they all might not be of superior quality.

Create Pearly, White Teeth Using Photoshop

Create Pearly, White Teeth Using Photoshop
Open the image in Photoshop, preferably in a JPEG format. The first step in the direction of pearly white teeth is focus on the environment ie the teeth using the Lasso tool.

Now go to the vertical menu bar, and select the Dodge tool. This used to be part of a photo or image lighter. Using the Dodge tool will brighten the selected area (the teeth) in the picture. The Dodge tool is an excellent option that can be used around the eyes, teeth bleaching or other areas of your image that you want lit.

The next step is brushing the teeth, literally. Go to the brush drop down menu and choose a fuzzy brush. Make sure the size is optimal when working with a brush that is too small or too large can affect the overall quality of the image. Try choosing a size as accurately as possible, a balanced and natural effect.

Select 50% exposure as a natural brightness that goes well with most pictures. Now even the Dodge tool moves over the teeth to whiten them. You can adjust the exposure if you keep the teeth looking "unnatural" white.

Use the "magnifying glass" icon in the toolbar to zoom in on the area where you work. Lets take a look at the area and then take so run the brush over the teeth. Use slow movements without letting go of your mouse, and enter your brush as often as you like until the desired whiteness is achieved.

If you think you exaggerated the whitening, you can easily fix. Click Edit> Step back and you will have a lighter tone to go, or you can use the "Fade Dodge tool in the edit area to use the entire whitening effects fade. You can use this as per your needs and preferences.

Make sure no bumps in the selected area, and you have not left out any patches perhaps odd in the final product. The teeth should be evenly lit and any stains or imperfections must be corrected.

When the desired brightness and whitening is reached, desaturate the photo. Select the 'Desaturate' tool to even out the whole area where you used the Dodge tool.

This is just one of many ways to whiten teeth in a natural and simple way. To learn such techniques and methods, you must register for a Photoshop tutorial or training and gain full insight into the various aspects of Photoshop.

Wednesday, 10 March 2010

1000s of Free Photoshop Plugins & Filters MegaList

Have you been looking for a way to add some extra zest to your Photoshop images? Have you wanted to find some cool Photoshop filters but didn't want to spend any of your cash? Well, I have put together a long list of Free Photoshop Plugin along with a summary of what you will find on each of these sites. Amongst all of these sites you will be able to find 1000s of Photoshop plugins and filters so I hope that you have some time on your hands. Please comment about sites that I have missed. Have fun Photoshopping.

You might also enjoy our List of Adobe Illustrator Plugins and Filters.

8bf Plugins - Free Photoshop plugins inlcuding plugins that can add an unending variety of frames to your images, filter to frame and matte your images, a texture frame filter, a plugin to add texture to frames, plugin for a transparent frame, plugin to use to allow layer beneath to show through and make a frame, adjust focus and all color values all at once, filter that adds grain or RGB noise to your images, filter that scatters your pixels, a plugin that is a transparency mask filter resembling marble, plugin that converts color to a single hue without affecting saturation or luminosity values, filter to blur only the colors of your image, not the luminosity, add a marble texture to your images, simplify your image for artistic effects, find and adjust edges for artistic effects,three median filters for image simplification and dust reduction, filter for an attempt at a watercolor wash, and many more.
Amphisoft - Free plug-in filters for Adobe Photoshop, Photoshop Elements, Macromedia Fireworks, JASC and Corel PaintShop Pro, PhotoPaint and other image editors for Windows. Some of the filters include Photo Sharpen, Photo Tinter, Toadies, Photo Detailer, and a plugin set of 10 freeware and shareware plug-in filters for various special effects and general image editing.

Almathera Plugins - The Almathera plugins are free and you can create shape, bevel, halo, drop shadow, grayscale, warp, lightning and puddle effects.

Cybia Plug-In Filters - This freeware filters pack includes 6 filters with various transparency properties, 20 filters for modifying the colours in your images, 20 filters for producing edge/contour effects, 30 filters with different screen/mesh overlays, 20 filters containing simple emboss variations, 15 filters that "swap" colour values in your images, 20 filters to "blast" colours giving a strong cast, and 15 filters for producing mezzo and grain effects.

DCFilters - They have large selection of filters including ones for bricks, edger, border fade, color fade, ice, melt, pattern edit, problend, rough tile blend, and many more.

Deep Paint 2.0 - Deep Paint offers a realistic painting experience for digital artists and graphics professionals. Deep Paint intergrates stroke-by-stroke artistic photo-cloning, fully editable brush and canvas settings, and paint functionality for realistic and stunning paint effects. Experience thickly textured oils, bold acrylics, and dramatic watercolors. Deep paint simplifies your artistic workflow as a Photoshop plug-in or standalone application, with special support for the Wacom Intuos or compatible pressure sensitive pad.

Des Filtres - Site is in French but there must be a 100 filters that I believe are free.

Digital ArtShop - A large number of filters and plugins, but only a free of them are free including Greyscaler, Iridescent, Image Encoder, and Sketcher (this one isn't free but very cool).

Flaming Pear - The Flaming Pear download page includes plugins and filters including Creative Pack, Mr.Contrast, Flood, Cool Designer Plugins, Flexify, Polymerge, LunarCell, India Ink, Hue and Cry, Glitterato, Solar Cell, Photography Pack, Tesselation, Patterns, Free Plugins, and more.

Free Photoshop Plugins - You can download about a dozen free Photoshop plugins on Free Photoshop including Berthold Daum Filters, CPK Filters, Crescent Moon Filters, PNG Format Plugin, Sabercat Filters, Scribe Filters, Ripleyer Filter, Ripleyer Filter, Sabercat Filters, Scribe Filters, Ripleyer, Scan Line Plugin, Red Eye filter, and Pro Canvas plugin.

GraphicXtras - A selection of plugins for Photoshop, Illustrator, Flash, and other programs. Some of the free Photoshop filters include filters for tons of custom shapes, gothic effects, frames, a 14 plugin demo set, and brushes.

GoPog - Filters include Mono Renditionizer, Lab Overlayer, Variable Blurrinator, Mono Renditionizer, and more.

Harry's Filters - Harry's Filters is a free Photoshop-compatible plugin containing up to 69 different image effects. They were formerly also known under the name "VideoRave". Harry's Filters 3 lets you choose the appropriate effect without hassling through different menus and dialogs. The main effect categories are called Color, Artistic, Gradients, Patterns, Warp, Noise, En/Decrypt, Other and Nature. They include filters for changing the image color or mood, for creating artistic effects, producing colorful gradients or impressive patterns, warping images and adding special noise effects to image. Additionally they let you encrypting and decrypting images with 64 bit keys, produce zoom, mirror or paint effects as well as natural effects like lightning, tornado and polar lights.

Little Ink Spot - Little Ink Spot plugins include chalkoholic for a chalk effect on your photos, Thredholder which find edges on photos making a cool sketch like effect, and xpose plugin which is for effects such as contrasts, shadows, underexposed, pefectly exposed and balanced, washed out look, enriched and more.

Luce - Plugins for light effects.

Mayhem Studios - 4 free Adobe Photoshop filters to download including filters for red eye removal, a filter for repetitive tasks, a filter to sharpen your photographs, and a guides action that finds the center in a snap.

Mehdi Plugins - Free Photoshop plugins include Absolute Color Blots, Color MegaMix, Contrast Balance, Curves, Edges Fx, Equalizer, Eraser Classic, Eraser Genuine, Fine Threshold, Fur, Gradient Smithy, Grain Natural, HSL Plus, Julia World, Kaleidoscope, Local Equalization, Melt, Projection, Posterizer, Quick Mirror, Seamless Border, Sorting Tiles Vibrations, Wavy Lab, and Weaver.

Mezzoforce Plugins - Lite versions of the Mezzoforce plugins are free including Mezzoforce Ice, Mezzoforce PainterTool, Mezzoforce Metalyzer, and Mezzoforce WaterColors.

MV's Plugins - A collection of Photoshop compatible plugins that are free to download including filters for correct chromatic aberration and purple fringing, a 3D color analysis tool, a filter to eplace specific color (even gray), a plugin to manage images with high dynamic range Debarreller, a plugin that is sort of histogram stretching, a plugin to fill an area by interpolation from neighbor pixels, a tool to undo color clipping in overexposed regions, a plugin for pre- or postprocessing for panorama stitching, a plugin that is a variant of "Fill" Perspective, a plugin to tilt and pan your image, a fun tool to distort images, a filter for red eyes removal, a tile puzzle creator, a filter that is a kind of a healing brush, a plugin to compensate or apply vignetting effects, and a filter for sharpening without halos.

NameSurpressed Photoshop Plugins - These plugins are free for only 21 days, so it is up to you whether or not you want to thry them. These products include the Softener soft focus plugin, Plaid Lite for seamless plaid patterns, and Autochromatic for sepia & color effects

Phillip Spoeth Plugins - Here are a few Photoshop plugins, one of them creates cool patterns, one of them creates a 3d rendering wire effect, distortions efffect, and one that creates a dot grid...very cool.

Photoshop Filters Factory - About 400 free Photoshop filters. This is the largest collection of filters available for Photoshop, they are all free and made with the Filter Factory module (provided with PS) by various authors.
Photoshop Scripts Plugins - A Spanish site with freeware filters. The plugins are called Watercolor, B&W, drawing, Dream, Threshold, Tone Effect, Splash, High-Key, Dynamic Color, Convolution Draw, Graduated Filter and Center Spot.

Photo-Plugins - These seem to be high quality Photoshop plugins including these plugins - B/W Conversion, Selective Saturation, Local Contrast, High Pass Sharpen, Soft Focus, Lens Correction, Contrast Mask, and Gradient Blur.

Plugin Site - A large selection of plugins / filters including filters for color correction, contrast, exposure and saturation of photos, filters for sharpening photos, plugin for performing shadow/highlight, lighting and color-based corrections, a mosaic plugin, illumination plugin, a plugin a tool for B/W conversion, for creating traditional B/W effects and for enhancing B/W photos, a collection of free plugins for performing usefull photo manipulations and effects, a page curl plugin, star field, diffuse, rippled glass, cave edge, jungle edge, curved edge, cutline edge, quad feedback, tunnel feedback, space worm, dragon's tail, butterfly, plate, wall, RGB saturation, erode En/Decryption and cross En/Decryption, frosted edge, zebra stripe, gradient sky.

Richard Roseman - Many very good Photoshop filters here including 3D Sphere Generator, Color Bar Generator, Scanlines Generator, Grid Generator, Grain Generator, Diffuse Glow, Spherical Mapping Corrector, Lens Distortion Corrector, Diffusion Effects, Halftone Patterns, Pixelate, Tiler, Pinch Distortion, Squarify Distortion, Evaluate ( it can perform more than 50 different image processing operations ranging from color replacement, color inversion, color swapping, greyscale conversion, color clamping, color multiplication and division, color trigonometrical mathematics, pixel blurring, pixel grain, and much, much more. Any of these effects can be applied to specific color ranges, specific luma ranges, specific color channels or any combination of any of these and more), Portable PixMap, Superformula Geometric Shapes, Solid Border, Smart De-Interlacer, Ultimate Artist Aggravator, Lens FX, and Pixel Quantification.

Sloshifiers - If you have photoshop or one of those other programs by adobe that supports photoshop plugins, you can download the photo killers plugin. it contains many effects of the photo killer, but they are not all exactly the same. For example, irradiate is a lot worse, and grapeify is just a "fake" because the real grapeify is too complicated for photoshop, apparently. But, the filters do run a lot faster on photoshop It containsirradiate, advanced gray, advanced gray2, change dark shoes, change shoes, drunkenness, fat dead, grapeify, humanoid, invert color, irradiate, kindofinvert, pastelize, please clayify, space chalk, stress test, true black and white.

Easy Filter - Free plugins including color curve correction, and an image color adjustment plugin.

ULead Free Plugins and Goodies - Free Photoshop goodies including the filters for digital tie-dye by creating multi-color patterns swirls and backgrounds, a plugin for 8 natural particle effects for images and selections - smoke, fire, bubbles, clouds, rain and mor, a plugin to take any image or selection and warp, distor, and twist it into surreal patterns, and also a plugin that changes DV Type I format video to DV Type II.

VanDerLee - Inlcudes both free and commercial Photoshop plug-ins. The free ones includes plugins that generate realistic camouflage patterns in Photoshop, render harmonic waves, add realistic night-goggle and imaging distortion to images, render falling snowflakes, confetti and other particle effects in Photoshop, and a plug-in to cover any landscape or object in snow.

Vector Plugins - This page is in Japanese but the plugins are still usable if you speak English. The plugins include 13area, 1stImpact, 3DTile, Adjuster, Alchemist Pro, Ancient Paintings, BambooCraft, Bedlam, Bokassher, ButColor, ButtonMagic, ClassicalGold, CoolColor, CrazyTile, CuteMozaic, CycloidDistortion, DeftMove, DemonishCell, DemonishSkin, Eloquency, Embossher, Enhancer, EqualLevel, FillHarmony, FireWork, FlowerFrame, FlushIt, FoolishStripe, Gingum.

Verlag Martin Koch Plugins - A small collection of Photoshop plugins that can dither, cleanup, create halftones, and create lines (only the lines and dither filter are free).

Virtual Photographer - Download the free Photoshop plug-in that's getting rave reviews from digital photographers. virtualPhotographer lets you instantly apply high quality, professional photographic styles to your digital images, with just one click. virtualPhotographer includes over 50 presets that automatically apply combinations of film grain, color modification, B/W, soft focus, high contrast and many artistic effects to achieve the same professional-looking images that used to take hours of photo editing. Get results in seconds!

Xero Graphics - Free Adobe Photoshop filters including filters that create starburt effects, monochromes, Oil-painting effects, snowflakes and manic mandalas, sparkles, twinkles, blobs, glowing mistification, conversion of a layers to grayscale, lithography effect, moonlit nights, porcelain, foliage effects, skycleaner, grain effects, modern art effects, cubism artistic effects, illustrator artistic effects, fog filter, clean up noise, artistic 'wash' effects, ultraviolet effects, duochrome two-colour tinting effects, emphasis or de-emphasise selected colours, fuzzifier, de-noising and sharpening, lineart 'graphic art' effect, pastel art effect, image texturiser, tweaker for shadows and highlights, abstract art, painterly effects, pixellation, iridescent metallic sheens, virtual studio lighting, touch of romance for portraits, graphic poster effects, vignette effects, and titanium metal effects.

Tuesday, 9 March 2010

Membuat efek cembung pada Foto

Tentu anda sering melihat foto pemandanga berisi efek mata ikan di majalah atau buku lainnya. Efek mata ikan itu bias anda buat sendiri menggunakan bantuan Photoshop.

1.Langkah pertama yang mesti anda lakukan adalah membuka foto/image. Gunakan image yang anda sukai ( lebih baik menggunakan pemandangan karena efek ini lebih cocok di gunakan pada foto pemandangan).Membuat efek cembung pada Foto2.Langkah berikutnya anda gunakan elliptical marquee tool untuk membuat lingkaran, anda bisa menggunakan oval atau bulat penuh, tergantung selerea anda.
Membuat efek cembung pada Foto3. Berilah efek cembung dengan menggunakan efek filter/distort/spherize.

Gunakan amount 100% dan pilih normal untuk modenya. Setelah itu klik ok.

4. Perjelas efek cembung dengan membuat layer via copy dengan cara klik kanan pada area cembung yang masih terseleksi setelah itu pilih layer via copy.
Membuat efek cembung pada Foto5. Langkah selanjutnya adalah memberi warna pada tepian sehingga akan bersinar dan menambah efek cembung. Clik layer yang kita buat menggunakan layer via copy, kemudian pilih menu layer, layer style trus blending option. Centang pada opsi outer glow. Pilih mode normal dan amount sesuai dengan selera anda.
Membuat efek cembung pada Foto
6. Jika gambar anda terang, untuk mempertajam efek ini anda bisa membuat background sedikit lebih gelap dengan cara klik layer yang kita buat, maka akan muncul kembali lingkaran terseleksi. Tekan [ctr] + [ship] + [i], untuk membalik seleksi. Lalu klik background/gambar yang utuh dan atur brightness/contras dengan cara Pilih menu image, adjustment, brightness dan contras.

Jadi deh efek sederhana kita…SELAMAT MENCOBA......

Monday, 8 March 2010

How to use photoshop tutorials to create a bright light spiral circle

Description: This photoshop tutorial website has free lesson instructions to draw or design a bright light spiral of light and sparkling stars.Spiral Galaxy photoshop tutorial – Electric spiral light photoshop tutorial and tricks.

Free photoshop tutorial how to make a Prime-spiral in photoshopphotoshop-tutorial[1] Take a new file of 400 pixels,400 pixels, of resolution 72 dpi in the RGB mode.photoshop-tutorial[2] Make a new layer from the layer pallete and fill the color blackphotoshop-tutorial[3] Now go to Filter>Render>Lens Flarephotoshop-tutorialphotoshop-tutorial[4] Your image will look like this.photoshop-tutorial[6] Make the copy of layer1 and change the blending mode "Lighten".photoshop-tutorial[7] Go to Edit>Transform Rotate 90CW.

[8] Your image will look like this.photoshop-tutorial[9] Do this step two more time, make the copy of layer and go to Edit>Transform Rotate 90CW
your image should be look like this.photoshop-tutorial[10] Now go to Layer>Flatten Image see in the fig.photoshop-tutorial[11] Make the copy of layer and change the blending mode "Screen".photoshop-tutorial[12] Now Cntl+T and rotate the layer 0 copy as shown below image.photoshop-tutorial[13] Here is your final image.photoshop-tutorial

Easy Abstract Photoshop Tutorial

This tutorial will show how to create a very simple abstract shape using a few brushes and effects. For this tutorial I will be using Adobe Photoshop CS3. If you have an older version of Adobe Photoshop, you may still be able to follow this tutorial.

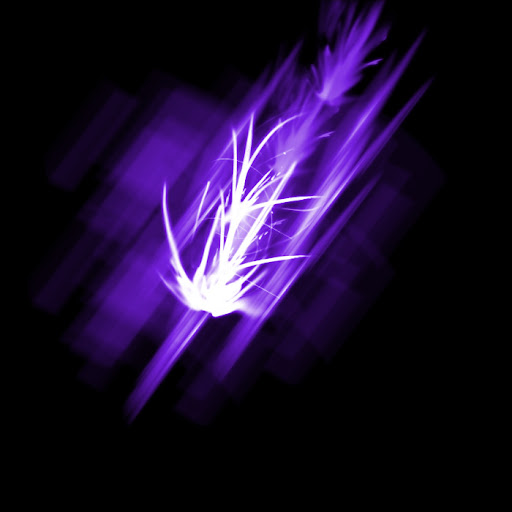
Keep in mind that it would be nearly impossible to duplicate this exact object, but this tutorial should give a guide to creating your own unique object. You should end up with something like this.Photoshop Tutorial
The first thing we need to do is download the brush set for this tutorial. You can download the free Trance Brushes from Brusheezy.com by clicking here.

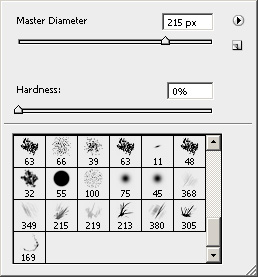
After you download the brushes, extract the .abr file from the .zip and save it.Photoshop TutorialOpen Adobe Photoshop and create a new document 700×700.Photoshop TutorialFill the background layer with black (#000000) and select the brush tool.Photoshop TutorialLoad the brush set that you just downloaded by clicking the drop down next to the brush > the arrow point right > then the load option.Photoshop TutorialSelect the Trance Brushes and load them. You will see the new brushes appear at the bottom of the brush set.Photoshop TutorialReset the color swatches so that white is the foreground color and black is the background color. Create a new layer and use some of the brushes to create an abstract shape. When you are painting with these brushes, do not drag the mouse like you normally would. Instead click once to create the shape. There is really no science to this. First I will use brush 305 to create this.
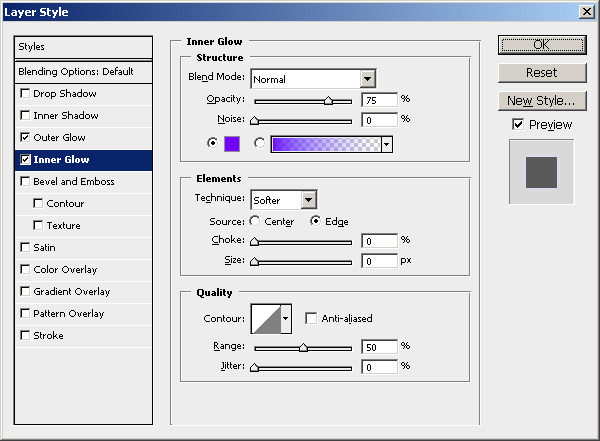
Photoshop TutorialNext I will add a few more with #213.Photoshop TutorialThen I will use 215 to make a tail.Photoshop TutorialTo complete this shape I will dab a couple times with the brushe that is numbered 380 for me.Photoshop TutorialLike I said before, there is no set way to do this, just come up with a shape you like. Now to add a little bit of color I will apple a purple glow. Right click on the layer in the layers pallet and select blending options.Photoshop TutorialApply an outer glow using the color #7200ff.Photoshop TutorialI also added an inner glow using the same color #7200ff.Photoshop TutorialApply the changes and you should get something like this.Photoshop TutorialNow we are going to distort the image using the polar coordinate filter. Click Filter > Distort > Polar coordinates.Photoshop TutorialMake sure that Rectangular to Polar is selected and click okPhotoshop TutorialYou will get something like this.Photoshop TutorialWhere the object is located on the canvas will effect how it is distorted. If you do not like the way it came out, undo the filter and move the object. Then try to apply the filter again. Mine looks ok, but I think it is a little blurry.

I am going to apply the Smart Sharpen filter to sharpen up the image. Click Filter > Sharpen > Smart Sharpen.Photoshop TutorialYou will have to play with the settings to see what looks the best for you, or you could skip this step completely. Here is what I used.Photoshop TutorialThis is what my image looks like now.Photoshop TutorialThat is all it takes to create a simple abstract shape using brushes. If you do a search online you can some great free brushes to play around with. You could also add some text to this and make into a background or something.Photoshop TutorialYou can source

Privacy Policy

Privacy Policy for http://easytutorialphotoshop.blogspot.com/

If you require any more information or have any questions about our privacy policy, please feel free to contact us by email at untungprasetiaelrahma@gmail.com.

At http://easytutorialphotoshop.blogspot.com/, the privacy of our visitors is of extreme importance to us. This privacy policy document outlines the types of personal information is received and collected by http://easytutorialphotoshop.blogspot.com/ and how it is used.

Log Files
Like many other Web sites, http://easytutorialphotoshop.blogspot.com/ makes use of log files. The information inside the log files includes internet protocol ( IP ) addresses, type of browser, Internet Service Provider ( ISP ), date/time stamp, referring/exit pages, and number of clicks to analyze trends, administer the site, track user’s movement around the site, and gather demographic information. IP addresses, and other such information are not linked to any information that is personally identifiable.

Cookies and Web Beacons
http://easytutorialphotoshop.blogspot.com/ does use cookies to store information about visitors preferences, record user-specific information on which pages the user access or visit, customize Web page content based on visitors browser type or other information that the visitor sends via their browser.

DoubleClick DART Cookie
.:: Google, as a third party vendor, uses cookies to serve ads on http://easytutorialphotoshop.blogspot.com/.
.:: Google's use of the DART cookie enables it to serve ads to users based on their visit to http://easytutorialphotoshop.blogspot.com/ and other sites on the Internet.
.:: Users may opt out of the use of the DART cookie by visiting the Google ad and content network privacy policy at the following URL - http://www.google.com/privacy_ads.html

Some of our advertising partners may use cookies and web beacons on our site. Our advertising partners include ....
Google Adsense


These third-party ad servers or ad networks use technology to the advertisements and links that appear on http://easytutorialphotoshop.blogspot.com/ send directly to your browsers. They automatically receive your IP address when this occurs. Other technologies ( such as cookies, JavaScript, or Web Beacons ) may also be used by the third-party ad networks to measure the effectiveness of their advertisements and / or to personalize the advertising content that you see.

http://easytutorialphotoshop.blogspot.com/ has no access to or control over these cookies that are used by third-party advertisers.

You should consult the respective privacy policies of these third-party ad servers for more detailed information on their practices as well as for instructions about how to opt-out of certain practices. http://easytutorialphotoshop.blogspot.com/'s privacy policy does not apply to, and we cannot control the activities of, such other advertisers or web sites.

If you wish to disable cookies, you may do so through your individual browser options. More detailed information about cookie management with specific web browsers can be found at the browsers' respective websites.